Christmas Tutorial Surprise – Mustache Wrapping Paper

This is part four of a four-part tutorial set of the Christmas Surprise I mentioned in the Weekly Photo Challenge post here. In each of the parts I will show you how I made all of these fun things:

  1. Mustache Wrapping Paper
  2. Ombre Bleach Tee
  3. Mustache Mug
  4. Merry Christmas Gift Bag

This is the finale and Mustache Wrapping Paper!

Christmas Tutorial Surprise

~~~ Ingredients ~~~

  • Black Sharpie
  • Paper (make sure it’s big enough to wrap your present)
  • Scissors
  • Red Yarn
  • Tape

Christmas Tutorial Surprise

~~~ Instructions ~~~

1. First thing to do is figure out which direction the mustaches need to face. If your present is tall then you might want the mustaches going around it, but if it is short then you might want them going over. Maybe diagonal??? You decide.

Once you figure it out, start drawing mustaches with your sharpie. Note: You could also make a few mustache stamps and then just stamp them on. I don’t have stamps, stamp ink or the means of making such things right now, so I went with the marker :)

Christmas Tutorial Surprise

Christmas Tutorial Surprise

Christmas Tutorial Surprise

Christmas Tutorial Surprise

Christmas Tutorial Surprise

2. Now that your paper is covered and technically wrapping paper, it’s time to cover the gift! Wrap that present! Make sure the right-side is facing out. Don’t want all that work to go for nothing. That is, unless you want the bleed-though mustache look, then by all means do it.

Christmas Tutorial Surprise

Christmas Tutorial Surprise

3. Once your present is all taped and wrapped, it’s time for a bow. I really liked how the red yarn looked with the mustaches *(See the end for my bad joke). I just wrapped the yarn around and then ended with a simple bow on top. Cuteness!!

Christmas Tutorial Surprise - Mustache Wrapping Paper

~~~~

Well this is the end of the Christmas Surprise Tutorial. I hope you get to try one of them out :) Thanks for joining me!!

*What’s black and white and red all over??? A mustache Christmas gift of course!!

Christmas Tutorial Surprise – Ombre Bleach Tee

This is part three of a four-part tutorial set of the Christmas Surprise I mentioned in the Weekly Photo Challenge post here. In each of the parts I will show you how I made all of these fun things:

Christmas Tutorial Surprise

  1. Mustache Wrapping Paper
  2. Ombre Bleach Tee
  3. Mustache Mug
  4. Merry Christmas Gift Bag

This one is my favorite :D THE OMBRE SHIRT!!!

Christmas Tutorial Surprise

It was surprising to look for a bleach ombre shirt tutorial and not find one ANYWHERE. Pinterest only had blue jean ugliness and google was about as much help. The closest thing I found was a picture and a paragraph saying “I used bleach, water and this shirt and this is what I got!” WOW. Super descriptive. And that is why this one is most exciting to make :D

~~~ Ingredients ~~~

  • Plastic Bucket
  • Bleach
  • Cold Water
  • Warm Water (yes both)
  • Shirt
  • Rubber Bands
  • Rubber Gloves
  • Clothes that can get messed up
  • Room with plenty of air

Christmas Surprise Tutorial - Ombre Bleach Tee

~~~ Instructions ~~~

1. The first thing I did was figure out how many ombre stripes I wanted. Since I decided on four of them, I put three rubber bands on the shirt at equal lengths. You could do it however you wanted though. The smoother the ombre look you want, the more sections you need.

Christmas Tutorial Surprise

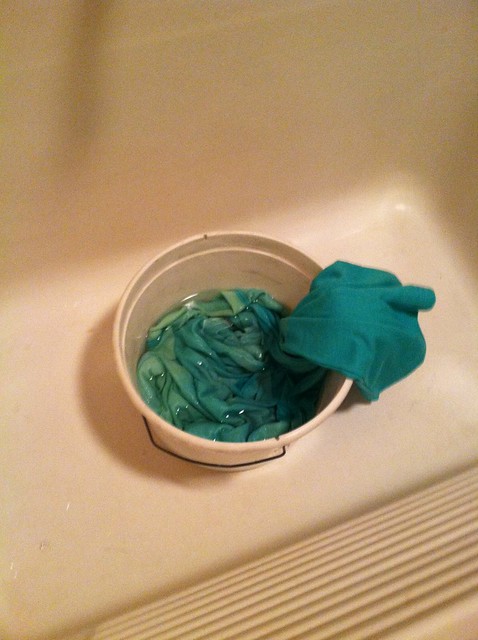
2. In a bucket combine bleach with warm water. My bleach directions told me to use 4 cups of warm water and 3/4 cup of bleach. It worked. You can try your bleach’s directions if you want though. Be careful since bleach is corrosive and does mean things to skin. I carried this bucket to a plastic wash sink to do this project (make sure you never put bleach in metal because it can eat a hole in it), mostly to make sure I didn’t make a ginormous mess haha

Christmas Tutorial Surprise

3. Wearing gloves, put the first end of the shirt into the bleach/water mixture. You will see it begin to change colors. Try to avoid putting the rubber band in the bleach. My bands made a smoke and sizzle that freaked me out. Only happened once, as I was very careful to avoid that circumstance again.

Christmas Tutorial Surprise

4. Continue moving the different sections into the bleach. You want to make sure that you keep them separate for long enough to see the change. If you a much more gradient look, then move more consistently between them. I wanted four distinct layers and that’s what happened.

Christmas Tutorial Surprise

You can see that the first part of the shirt in the bleach is clearly lighter than the last part. I also didn’t want the true color of the shirt to be lost, so I left the end of the shirt out of the bleach completely.

5. Once the shirt is to the color you want, rinse in cold water to stop the bleaching process. Rinse and wring completely.

Christmas Tutorial Surprise

You can see that the bleach doesn’t move in a straight line. That’s part of the fun :) You never know what you will get!

6. Let the shirt dry. Then you can throw it in the wash ALONE with soap to get all of the bleach out. The shirt dye and the bleach could make an interesting piece of clothing if you threw anything else in with it.

Christmas Tutorial Surprise

~~~~

I hope you love it as much as I do!! Oh and you should note that the thread color of the shirt was unaffected by the bleach. You could effectively bleach a shirt completely (except for thread) and then dye it back in a different color. Just a pondering thought for a cool experiment.

Christmas Tutorial Surprise – Mustache Mug

This is part two of a four-part tutorial set of the Christmas Surprise I mentioned in the Weekly Photo Challenge post here. In each of the parts I will show you how I made all of these fun things:

  1. Mustache Wrapping Paper
  2. Ombre Bleach Tee
  3. Mustache Mug
  4. Merry Christmas Gift Bag

Now for the Mustache Mug!

Christmas Tutorial Surprise

~~~ Ingredients ~~~

  • Black Sharpie
  • Cool Porcelain Mug (mine was from Anthropologie because I wanted the K on it)
  • Oven (preheated to 350 degrees Fahrenheit)

Christmas Tutorial Surprise

~~~ Instructions ~~~

1. Grab your mug!

Christmas Tutorial Surprise

2. Then figure out where you want to doodle, making sure that it isn’t a place you would put your mouth. (The Sharpie may come off and you wouldn’t want to drink/eat that. Bleh!) I chose the bottom of the mug to give that magnificent mustached face effect. Doodle your creation on the mug. Mine was freehand so sorry, no pattern.

Christmas Tutorial Surprise

Christmas Tutorial Surprise – Mustache Mug

3. Hopefully, your oven is ready. Mine wasn’t.

Christmas Tutorial Surprise

When it is finally at 350 degrees, place your mug in the oven and bake for 30 minutes. I placed mine directly on the rack. After it is finished baking, carefully remove the mug from the oven and allow to cool. It will be extremely hot! BE CAREFUL! Burns hurt. Trust me. My fingers have felt the power of the burn more than once.

4. Admire your lovely cooled off creation!

Christmas Tutorial Surprise

~~~~~~~~~

Just in case you were wondering, I found the instructions for this tutorial at A Beautiful Mess. I love their blog!! Sooooo many cute things :D

Christmas Tutorial Surprise – Gift Bag

This is part one of a four-part tutorial set of the Christmas Surprise I mentioned in the Weekly Photo Challenge post here. In each of the parts I will show you how I made all of these fun things:

Christmas Tutorial Surprise

  1. Mustache Wrapping Paper
  2. Ombre Bleach Tee
  3. Mustache Mug
  4. Merry Christmas Gift Bag

First, the gift bag!!

Christmas Tutorial Surprise - Gift Bag

~~~ Ingredients ~~~

  • Paint Brush
  • Cup of Water
  • Paper Towel (because I’m ALWAYS messy)
  • Extra glue
  • Mod Podge
  • Micron Pen
  • Green Yarn
  • Cream Cloth Bits (quilt scraps)
  • Red Cloth Bits (Grandma scraps)
  • Cream Bag (mine was from Anthropologie. I bought super cute drawer knobs!!)
  • Scissors

Christmas Tutorial Surprise

~~~ Instructions ~~~

1. Lay your bag flat with one side facing up. (If you choose to cover both sides like I did, then you will need to do them one at a time. They stick better that way.) Pick your red cloth and arrange over the label.

Christmas Tutorial Surprise

Christmas Tutorial Surprise

When you find a position you are happy with, mod podge the back of the cloth bits and attach to the gift bag. I used the paint brush and painted the cloth, then I pressed it onto the bag. It was very wet and sticky :)

Christmas Tutorial Surprise

Christmas Tutorial Surprise

2. While that is drying, it’s time to make some “Merry Christmas!” declaration bits. Using the micron pen and the cream scraps, write “Merry Christmas” in a pretty font on the fabric. Then using scissors trim it down to the size you like. I used two different sizes on my bag.

Christmas Tutorial Surprise

3. Using the mod podge, paint the back of the Christmas scrap and attach it the the red bits already on the bag. Note: My red scraps were still wet when I added the cream bit. It worked fine for me, but it may work better if you let the red dry completely first. One of mine did peel a bit on the edge when drying so I used the glue to put it back on.

Christmas Tutorial Surprise

Christmas Tutorial Surprise

Christmas Tutorial Surprise

4. While those are drying, grab the green yarn.

Christmas Tutorial Surprise

Cut it into two equal lengths (I knotted the ends.) and dip into mod podge. You want the yarn dripping wet. Squeeze out the excess mod podge and lay the yarn across the bag, one above and the other below the “Merry Christmas” label.

Christmas Tutorial Surprise

Christmas Tutorial Surprise

5. Allow to dry completely. Flip bag over and repeat steps if desired.

Christmas Tutorial Surprise

Well, there you have it. A cute personalized gift bag! You could do so many different things. For a wedding you could have a colored bag with a white dress cutout mod pogded with “Congratulations!” on there. A valentine bag would be adorable. Oh! And a “Happy Birthday!!” one could be extra fun. Imagine the random bits of cloth that could be confetti, balloons, presents and cake! Oh the possibilities!!

[day 11] Thirty Day Photo Challenge: September 2012 Edition

Soooo I missed it. By a long shot. Oh wells. Today will just have to have two posts instead of one :) I did actually take a picture yesterday. I was on the swing in my mustache you a question bleach tee listening to some Jamie Grace. LOVE her stuff. And this is the blurry picture that resulted.

Day 11:

20120912-111217.jpg

Acrylic Nail Tutorial: Gray Business

Hey peoples! This is another acrylic nail art tutorial. Unfortunately I was in a hurry on Friday and didn’t make a video of my nail painting. I could have, but I would have seemed overkill to me since this one is pretty easy. It is basically two coats of gray sandwiched between two clear coats. The hardest part was mixing the color to get the one I wanted. I also didn’t use an accent nail this time. Don’t get me wrong.. I love accent nails, but it just didn’t seem business appropriate for this occasion. Plus, tomorrow I have my professional meet and greet and I didn’t want to have to redo my nails for it :)

~~~ Gray Business Nail Tutorial ~~~
Materials:
Acrylic paint (I used a gray and white)
Clear nail polish
Paint brush
Water (to rinse brushes)
Cloth to wipe brushes on (I use a paper towel)
Plate, paper, board, or something else to mix colors on and put paint on

Acrylic Nail Tutorial: Gray Business

Instructions:

1) First add a clear coat to your nails. This gives the acrylic something to stick to and it protects your nail. I used a clear strengthener coat. Be sure to let it dry before you move on to the next step.

Acrylic Nail Tutorial: Gray Business

2) Then it’s time to mix your colors. Add a little dot of gray (or black depending on how dark you want to go) and white to your plate. Blend them together until you get the color you want. You might want to make a good amount of this color so that you don’t run out. I ran out three times. Luckily, I’ve been color blending since my mom let me first play with paint (19-20 years ago) so I’ve had good practice on matching colors I wanted.

Acrylic Nail Tutorial: Gray Business

Acrylic Nail Tutorial: Gray Business

3) Once you’ve got the color you want, it’s time to cover your nails. Don’t worry about messes because the acrylic washes off wonderfully. It’s one of the reasons that I like acrylic nail painting soooooo much more than plain nail polish. Mistake recovery is easy!

Acrylic Nail Tutorial: Gray Business

Acrylic Nail Tutorial: Gray Business

4) Once you’ve covered your nails with one or two coats of paint, it’s time for your clear coat. This is the time to make sure your nails are the way you want them to be. Cover with a clear coat. Be careful here. I did take off a bit of the paint on Friday while clear coating. Probably because I was in a hurry to finish before the recruiting picnic. Nevertheless, make sure you don’t rub the nail polish bristles too hard because paint WILL come off. It only happened on one finger… maybe because I slowed down after that :)

Acrylic Nail Tutorial: Gray Business

5) After your clear coat has dried, wash your hands really well. This will take off the extra acrylic paint, leaving a very nice looking nail job.

~~~

I really like the gray color. It looks great with my suit and professional tops. AND it looks good with my turquoise skinny jeans. Gotta have variety :) Feel free to pin it and view the rest of my nail inspirations/tutorials on my Nailed board on pinterest.

Acrylic Nail Tutorial: Glow-in-the-Dark

Hey peoples! This is another acrylic nail art tutorial. I meant to post it yesterday, but I made a tankini instead ;) I’ve made two ways to view this tutorial. You can read the instructions and view pictures OR you can scroll to the end and watch the youtube video. Your choice. I like having options in tutorials so I thought I’d share the same courtesy.

~~~ Glow-in-the-Dark Nail Tutorial ~~~
Materials:
Acrylic “Glow” paint – I used Green Glow by FolkArt
Clear nail polish
Paint brush
Water (to rinse brushes)
Cloth to wipe brushes on (I use a paper towel)
Plate, paper, board, or something else to mix colors on and put paint on

Instructions:

1) First add a clear coat to your nails. This gives the acrylic something to stick to and it protects your nail. I used a clear strengthener coat. Be sure to let it dry before you move on to the next step. Continue reading

Acrylic Nail Art Tutorial: Sea Foam Green

20120820-113059.jpg

Somewhere I saw the idea of using acrylic paint on nail polish followed by a top coat to paint your nails. It was probably either pinterest or youtube. It’s probably also pinned on my Nailed board for nail art, but that’s beside the point.

The point is I tried it out last Saturday and it works!! I was so surprised!! It’s such a good idea too. Imagine the cost that can be saved. Instead of many bottles of shades of one color nail polish, all I needed were bottles of black, white, and some other color (all of which were bought for under $1… take that nail polish people!) to get every shade imaginable of that color! Oh the possibilities make me happy :) The clean up is nice too. Soap and water and all the extra color on my hands is gone. Super fast. And the paint dries quickly. And it is durable. And if I mess up mid-painting, a little water lets me start over. And it doesn’t smell as bad. And it’s pretty. And….. you get the point.

~~~ Tutorial ~~~

Materials:
Acrylic paint (there is an endless range of colors, glitter paints, glow-in-the-dark paints, neons, etc.. check them out and get creative)
Clear nail polish
Paint brush
Water (to rinse brushes)
Cloth to wipe brushes on (I use a paper towel)
Plate, paper, board, or something else to mix colors on and put paint on

Instructions:

20120820-112957.jpg

1) First add a clear coat to your nails. This gives the acrylic something to stick to and it protects your nail. I used a clear strengthener coat. Be sure to let it dry before you move on to the next step. Continue reading

Hair Chalking Redo Tutorial

This is another how-to on hair chalking :)

~~~ Tutorial ~~~
First prepare to have dirty hands, but no worries because they clean up quickly!

Materials:

  • Water (spray bottle, sink, bucket, etc… just need a way to get it on the hair. I used my hand.)
  • Soft Pastels (don’t use oil pastels, as they will make your hair nasty, or sidewalk chalk since it won’t stick)
  • Towel (only if putting heat near someone’s face)
  • Straightener or Hair Dryer (flat iron works best and you just wipe it off when done)

Instructions:

1) Wet the hair completely.

2) Pick a section of hair. It is best to use small portions. Rub the pastel in a downward direction. Keep rubbing down. If you start rubbing up the hair, it will take the pastel back off. If the pastel isn’t sticking, try wetting the actual pastel stick to get more pigment. I also found that rubbing the long side of the pastel down the hair left more pigment than the small drawing end. Scroll down to see how to do ombre, if you like that look. Continue reading

Graphic Tee DIY (with bleach and a fabric pen)

I got the idea for bleach tees off pinterest. But first a warning about the post:

Warning! This post contains a ridiculous amount of pictures. Some of these images may contain mustaches, llamas and Darth Vader.

Well, that’s the warning :) I promised a bleach tee tutorial and this is it!

Materials (at least the ones I used):

  • shirt of some kind
  • design, preferably a clever and entertaining one ;)
  • bleach or bleach pen
  • fabric pen
  • freezer paper
  • x-acto knives
  • iron
  • sink with cold water
  • pen or pencil
  • cutting board
  • cardboard

Instructions:

1) Find or create a design. These are my designs. I created all of them except the Alice in Wonderland one :)

Continue reading