Called as God’s Chosen Child

If you remember a few weeks back, I wrote a poem for my friend Katie at My Eternal Voyage. We talk a lot and in one of those talkings we discovered something very exciting. Well, exciting for us and I hope you too. She loves to play music and sing. I’ve tried and it doesn’t work, but I love to write. She’s always wanted to put someone else’s words to music and I’ve always wanted someone to put music to my words. This is where I exclaim loudly how amazing God is. God is AWESOME!! Our friendship is a very interesting story anyways, but this has just been an added layer of coolness :D (She actually just posted about this if you want to read about it here. Great minds… what can you say?)

Most of the poems on here were written in high school. A small handful were written after, but not many. I thought for a long while that that phase of my life was over. Then I posted a poem (The Water Test) from back then and Katie asked if she could put music to it. I got really, really excited and promised to write her a song. That’s where Chosen Child came from. Because of her, I’ve been writing more again. It’s kinda like I’ve remembered why I loved to write in the first place. It’s an adventure to find the right words, right beat, and flow to the feeling(s) I wanted to share. I like that adventure, even if the story isn’t always mine.

Now Chosen Child has music, not lame music, but happy upbeat ukulele music!!! Andddd it’s posted for you to hear too :D

Hooray for our first collaboration in music and writing! HUZZAH! -fist pump knuckle touch-

One Not Alone Annual Report 2012

The WordPress team just sent me a 2012 annual report for One Not Alone. Being that I kinda love annual reports and facts tend to make me happy, I thought I would share :) I completely understand if you don’t care. I don’t know that I would care if it weren’t my blog haha!

Here’s an excerpt:

600 people reached the top of Mt. Everest in 2012. This blog got about 2,800 views in 2012. If every person who reached the top of Mt. Everest viewed this blog, it would have taken 5 years to get that many views.

Click here to see the complete report.

Swag… do what???

So it occurred to me the other day that I have no idea what the popular definition for the word swag has become, nor do I care to know. But it led me to thinking about why that word sounds so familiar. Then it hit me. Ahhhhhhh! Window treatments. Years ago, and by that I mean like 3 years ago, that popular word had no existence outside of the interior decorating world. Swag is in fact the word used for drapery. This led me to another thought and thus this picture:

Window Swag

So when did it change? Do you remember? Or did you ever even know the actual definition?

Breathe

There’s a pounding in my ears that won’t go away
My face, it aches from these tears today
But I need the release. I need the cleansing
That comes from this water. A salty rinsing.

Tears streaming down my face
Can’t hold them back
They won’t go back
I’m so alone and out of place
I can’t hear you
I can’t feel you

I could shed, a thousand tears
But they won’t wash away a thousand years
Every strained and gasping breath
A wet heart cry for some rest

Tears streaming down my face
I need you, Lord
I need your grace
I can’t go on, I’m so afraid
I must hear you
I must feel you

My lungs do burn, gasping for the air
I want to heal but I can’t go there
I’m addicted to my aching heart
Pain owns my mind right from the start

Tears streaming down my face
I hurt myself
To my disgrace
Heal me God, oh heal my pain!
I need to hear you!
I need to feel you!

Please!
Help me learn to
Breathe!
I’m down here on my
Knees!
Oh dear God, please take me!
Save me!

Tears streaming down my face
I’ve felt your love
I’ve felt your grace
You’ve given me your breath today
I can hear you
I can feel you
Breathe

“When God conditions…”

“When God conditions a man for greatness, He brings him through hardships that would break an ordinary spirit.”

– Basil Miller, “Hudson Taylor, For God and China”

Christmas Tutorial Surprise – Mustache Wrapping Paper

This is part four of a four-part tutorial set of the Christmas Surprise I mentioned in the Weekly Photo Challenge post here. In each of the parts I will show you how I made all of these fun things:

  1. Mustache Wrapping Paper
  2. Ombre Bleach Tee
  3. Mustache Mug
  4. Merry Christmas Gift Bag

This is the finale and Mustache Wrapping Paper!

Christmas Tutorial Surprise

~~~ Ingredients ~~~

  • Black Sharpie
  • Paper (make sure it’s big enough to wrap your present)
  • Scissors
  • Red Yarn
  • Tape

Christmas Tutorial Surprise

~~~ Instructions ~~~

1. First thing to do is figure out which direction the mustaches need to face. If your present is tall then you might want the mustaches going around it, but if it is short then you might want them going over. Maybe diagonal??? You decide.

Once you figure it out, start drawing mustaches with your sharpie. Note: You could also make a few mustache stamps and then just stamp them on. I don’t have stamps, stamp ink or the means of making such things right now, so I went with the marker :)

Christmas Tutorial Surprise

Christmas Tutorial Surprise

Christmas Tutorial Surprise

Christmas Tutorial Surprise

Christmas Tutorial Surprise

2. Now that your paper is covered and technically wrapping paper, it’s time to cover the gift! Wrap that present! Make sure the right-side is facing out. Don’t want all that work to go for nothing. That is, unless you want the bleed-though mustache look, then by all means do it.

Christmas Tutorial Surprise

Christmas Tutorial Surprise

3. Once your present is all taped and wrapped, it’s time for a bow. I really liked how the red yarn looked with the mustaches *(See the end for my bad joke). I just wrapped the yarn around and then ended with a simple bow on top. Cuteness!!

Christmas Tutorial Surprise - Mustache Wrapping Paper

~~~~

Well this is the end of the Christmas Surprise Tutorial. I hope you get to try one of them out :) Thanks for joining me!!

*What’s black and white and red all over??? A mustache Christmas gift of course!!

Christmas Tutorial Surprise – Ombre Bleach Tee

This is part three of a four-part tutorial set of the Christmas Surprise I mentioned in the Weekly Photo Challenge post here. In each of the parts I will show you how I made all of these fun things:

Christmas Tutorial Surprise

  1. Mustache Wrapping Paper
  2. Ombre Bleach Tee
  3. Mustache Mug
  4. Merry Christmas Gift Bag

This one is my favorite :D THE OMBRE SHIRT!!!

Christmas Tutorial Surprise

It was surprising to look for a bleach ombre shirt tutorial and not find one ANYWHERE. Pinterest only had blue jean ugliness and google was about as much help. The closest thing I found was a picture and a paragraph saying “I used bleach, water and this shirt and this is what I got!” WOW. Super descriptive. And that is why this one is most exciting to make :D

~~~ Ingredients ~~~

  • Plastic Bucket
  • Bleach
  • Cold Water
  • Warm Water (yes both)
  • Shirt
  • Rubber Bands
  • Rubber Gloves
  • Clothes that can get messed up
  • Room with plenty of air

Christmas Surprise Tutorial - Ombre Bleach Tee

~~~ Instructions ~~~

1. The first thing I did was figure out how many ombre stripes I wanted. Since I decided on four of them, I put three rubber bands on the shirt at equal lengths. You could do it however you wanted though. The smoother the ombre look you want, the more sections you need.

Christmas Tutorial Surprise

2. In a bucket combine bleach with warm water. My bleach directions told me to use 4 cups of warm water and 3/4 cup of bleach. It worked. You can try your bleach’s directions if you want though. Be careful since bleach is corrosive and does mean things to skin. I carried this bucket to a plastic wash sink to do this project (make sure you never put bleach in metal because it can eat a hole in it), mostly to make sure I didn’t make a ginormous mess haha

Christmas Tutorial Surprise

3. Wearing gloves, put the first end of the shirt into the bleach/water mixture. You will see it begin to change colors. Try to avoid putting the rubber band in the bleach. My bands made a smoke and sizzle that freaked me out. Only happened once, as I was very careful to avoid that circumstance again.

Christmas Tutorial Surprise

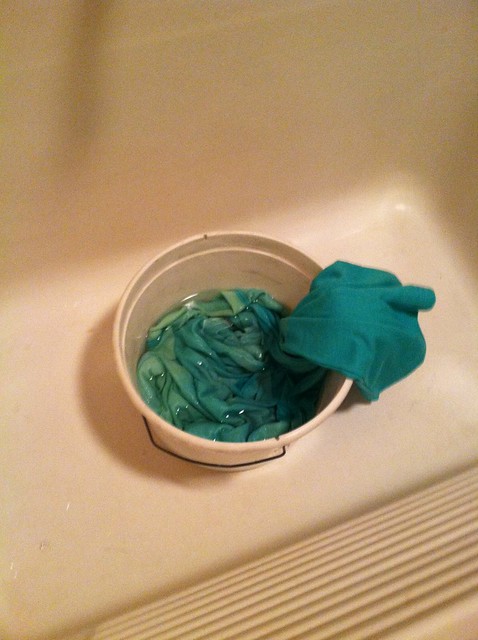
4. Continue moving the different sections into the bleach. You want to make sure that you keep them separate for long enough to see the change. If you a much more gradient look, then move more consistently between them. I wanted four distinct layers and that’s what happened.
Christmas Tutorial Surprise

You can see that the first part of the shirt in the bleach is clearly lighter than the last part. I also didn’t want the true color of the shirt to be lost, so I left the end of the shirt out of the bleach completely.

5. Once the shirt is to the color you want, rinse in cold water to stop the bleaching process. Rinse and wring completely.

Christmas Tutorial Surprise

You can see that the bleach doesn’t move in a straight line. That’s part of the fun :) You never know what you will get!

6. Let the shirt dry. Then you can throw it in the wash ALONE with soap to get all of the bleach out. The shirt dye and the bleach could make an interesting piece of clothing if you threw anything else in with it.

Christmas Tutorial Surprise

~~~~

I hope you love it as much as I do!! Oh and you should note that the thread color of the shirt was unaffected by the bleach. You could effectively bleach a shirt completely (except for thread) and then dye it back in a different color. Just a pondering thought for a cool experiment.